Image Features
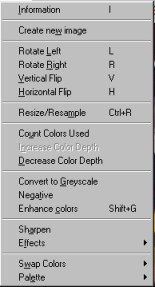 IrfanView's Image menu (at right) contains features for rotating an image, resizing
it, reducing the color count, enhancing colors, sharpening, and applying a few
special effect. We will change the brightness and contract of our
image, reduce to a size appropriate for the web, and finally sharpen.
Some designers capture or scan an image at a very high resolution, then
reduce and sharpening it several times to prepare it for the web.
IrfanView's Image menu (at right) contains features for rotating an image, resizing
it, reducing the color count, enhancing colors, sharpening, and applying a few
special effect. We will change the brightness and contract of our
image, reduce to a size appropriate for the web, and finally sharpen.
Some designers capture or scan an image at a very high resolution, then
reduce and sharpening it several times to prepare it for the web.
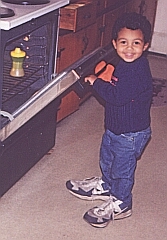
First let's apply Enhance colors of our image. For example we
want to bring out the blue sweater color. From the Image
menu select Enhance colors. This brings up a dialog box
to adjust the Balance, Brightness, Contrast, and Gamma Correction.
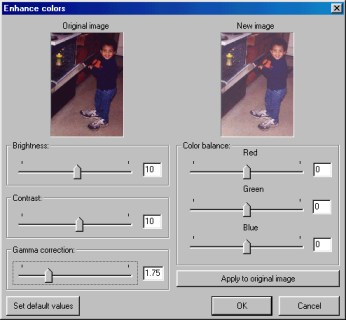
A rule of thumb is that the color parameters should be changed only a
little at a time. Observe whether the image has improving or
not. Then either continue making changes or go back. In the example
the Brightness and Contrast are set to 10 and the Gamma correction is
set to 1.75. The thumbnail shows the image with these values applied.
When it has the "right look" click Apply to original image
or OK.
Resize an image. After cropping the image was still 539x775,
an aspect ratio of 0.675 (=539/775) or about two-thirds. So how large
do we want the final image? 200x300? 160x240? This has to be determined by
how the image is to be used. Let's say we want the height to be 240 px.
From the Image menu select Resize/Resample.This brings up
the resize dialog box.
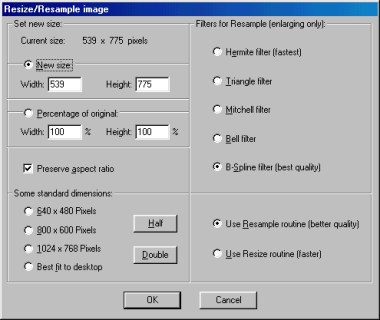
The image can be resized by either choosing a percentage of the original
or entering the new size. To prevent distortions (unless that is
what you want) make sure the Preserve aspect ratio box is checked.
Enter 240 for the new height; the width is automatically
calculated as 167 because the Preserve aspect ratio box is checked.
When the new size is set click OK to apply it to the image.
If you change your mind, Edit > Undo will reset the image to the
previous size.
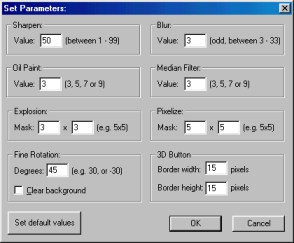 Okay, the size is fixed. Now let's Sharpen the image to
improve the edges. To determine how much sharpening will be done
select Image > Effects > Setup.
This brings up a dialog box with parameters for the various effects.
50 is the default value for Sharpen. Okay, let's try that. Close the
Parameters box by clicking OK or Cancel. Now select
Image > Sharpen. It doesn't look like there was a change.
Go back to Image > Effects > Setup and change the Sharpen
value to 75. Click OK and now select
Image > Sharpen. Ah, the image is sharpened.
Okay, the size is fixed. Now let's Sharpen the image to
improve the edges. To determine how much sharpening will be done
select Image > Effects > Setup.
This brings up a dialog box with parameters for the various effects.
50 is the default value for Sharpen. Okay, let's try that. Close the
Parameters box by clicking OK or Cancel. Now select
Image > Sharpen. It doesn't look like there was a change.
Go back to Image > Effects > Setup and change the Sharpen
value to 75. Click OK and now select
Image > Sharpen. Ah, the image is sharpened.
Well, we're done. Let's Save as a jpg image.
Here is what the final product looks like. It's size is 43.5 K.B