Creating a Gif Animation with ImageReady 1.0
- Preparation
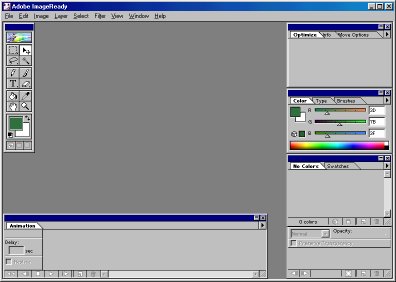
- Start ImageReady. Make sure the Animation palette is visible.
If it is not, choose Window > Show Animation to make it
visible.
- Six steps to construct an animation
- Create basic image (or open an existing multilayered image)
We will construct a simple image, a sign that says "WELCOME",
using the Toolbox.
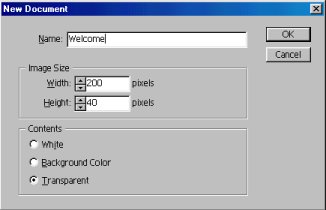
- First, select File>New
- In the dialog box that opens set:
Name: Welcome,
Image size: Width 200, Height 40, and
Content: transparent
Click "OK"
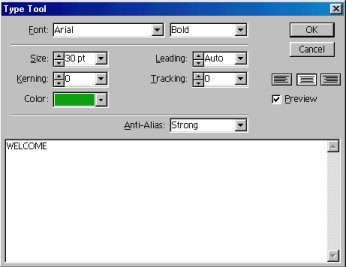
- Select the Text Tool in the Toolbox and click the blank
transparent image. The Type Tool box opens. Enter the following
settings and type "WELCOME" in the textbox.
Click "OK". Then use the Move tool to center the text in the image.
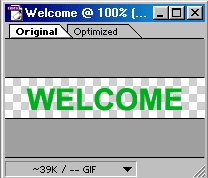
This is the basic image we will use to form the animation.
- Add animation frames
A thumbnail of the basic image should be located in the Animation
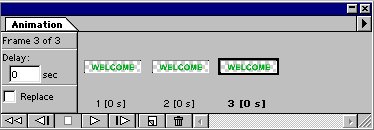
palette. The initial frame needs to be duplicated several times.
This is done by clicking the "Duplicate Current Frame" icon
 .
The result should look like
.
The result should look like
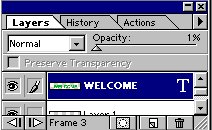
- Make changes in frames using Layer palette
Changes will be made in the first and third frames to create the
animation. In the third frame we will change the opacity so the
"WELCOME" message fades away. We will change the first frame so that
the message will move "onstage" from the left side to the center.
Select the third frame. Then in the Layer palette
move the opacity slider to 0%.
The message in the third frame should now be invisible.
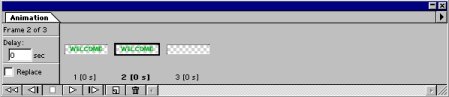
Now select the first frame. Using the Marquee tool (from the toolbox)
select the text "WELCOME". Then, using the Move tool, move the selection
just off the left edge of the image. The image below shows the text
partly moved.
- Add frames with Tween and add delays between frames
We now have three frames where the message is visible in the 2nd
frame, but invisible in the 1st and 3rd.
We will use the Tween Command to fill in frames to create the desired
actions.
First we will add frames between the 2nd and
3rd frames that will cause the message to fade away.
Select the 2nd frame.
Open the Animation palette menu (by clicking the small triangle
 in
the upper right of the Animation palette) and select Tween.
In the Tween dialog box select to add 6 frames, Tween with
Next Frame, and select Opacity to vary.
Clicking "OK" should add 6 more frames.
Now we want to use tweening to move the message from offstage to
the center. Select the 1st frame and select Tween
from the Animation menu as before. Use 6 new frames again, but this
time check Position and uncheck Opacity as the
feature to vary. Clicking "OK" adds 6 more frames as indicated.
It only remains to set the delay between frames. Go to the
Animation menu and select Set Delay for All Frames. In the
dialog box set the delay to 0.5 sec.
in
the upper right of the Animation palette) and select Tween.
In the Tween dialog box select to add 6 frames, Tween with
Next Frame, and select Opacity to vary.
Clicking "OK" should add 6 more frames.
Now we want to use tweening to move the message from offstage to
the center. Select the 1st frame and select Tween
from the Animation menu as before. Use 6 new frames again, but this
time check Position and uncheck Opacity as the
feature to vary. Clicking "OK" adds 6 more frames as indicated.
It only remains to set the delay between frames. Go to the
Animation menu and select Set Delay for All Frames. In the
dialog box set the delay to 0.5 sec.
- Preview animation
To view the animation
go to File>Preview File>Netscape
(or whatever browser is listed). It is good to check what
the animation looks like in all the popular browsers.
- Save animation
The layered animation is saved as a .psd file using
File>Save Original.
To save it as a gif animation
use File>Save Optimized.
An HTML file which includes the code for placing the animation
on a web page can also be generated by going to
File>Export>Save HTML.
- View the completed GIF animation
 Clicking "OK" should add 6 more frames.
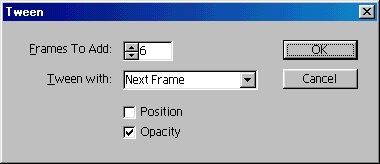 Now we want to use tweening to move the message from offstage to the center. Select the 1st frame and select Tween from the Animation menu as before. Use 6 new frames again, but this time check Position and uncheck Opacity as the feature to vary. Clicking "OK" adds 6 more frames as indicated.
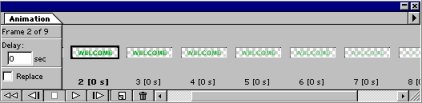 It only remains to set the delay between frames. Go to the Animation menu and select Set Delay for All Frames. In the dialog box set the delay to 0.5 sec.